Image editing
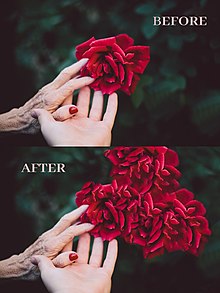
Image editing encompasses the processes of altering images, whether they are digital photographs, traditional photo-chemical photographs, or illustrations. Traditional analog image editing is known as photo retouching, using tools such as an airbrush to modify photographs or edit illustrations with any traditional art medium. Graphic software programs, which can be broadly grouped into vector graphics editors, raster graphics editors, and 3D modelers, are the primary tools with which a user may manipulate, enhance, and transform images. Many image editing programs are also used to render or create computer art from scratch. The term "image editing" usually refers only to the editing of 2D images, not 3D ones.
Basics of image editing
Raster images are stored on a computer in the form of a grid of picture elements, or pixels. These pixels contain the image's color and brightness information. Image editors can change the pixels to enhance the image in many ways. The pixels can be changed as a group or individually by the sophisticated algorithms within the image editors. This article mostly refers to bitmap graphics editors, which are often used to alter photographs and other raster graphics. However, vector graphics software, such as Adobe Illustrator, CorelDRAW, Xara Designer Pro or Inkscape, is used to create and modify vector images, which are stored as descriptions of lines, Bézier curves, and text instead of pixels. It is easier to rasterize a vector image than to vectorize a raster image; how to go about vectorizing a raster image is the focus of much research in the field of computer vision. Vector images can be modified more easily because they contain descriptions of the shapes for easy rearrangement. They are also scalable, being rasterizable at any resolution.
Automatic image enhancement
Camera or computer image editing programs often offer basic automatic image enhancement features that correct color hue and brightness imbalances as well as other image editing features, such as red eye removal, sharpness adjustments, zoom features and automatic cropping. These are called automatic because generally they happen without user interaction or are offered with one click of a button or mouse button or by selecting an option from a menu. Additionally, some automatic editing features offer a combination of editing actions with little or no user interaction.[citation needed]
Super-resolution imaging
Digital data compression
Many image file formats use data compression to reduce file size and save storage space. Digital compression of images may take place in the camera, or can be done on the computer with the image editor. When images are stored in JPEG format, compression has already taken place. Both cameras and computer programs allow the user to set the level of compression.
Some compression algorithms, such as those used in PNG file format, are lossless, which means no information is lost when the file is saved. By contrast, the more popular JPEG file format uses a lossy compression algorithm (based on discrete cosine transform coding) by which the greater the compression, the more information is lost, ultimately reducing image quality or detail that can not be restored. JPEG uses knowledge of the way the human visual system perceives color to make this loss of detail less noticeable.
Image editor features
Listed below are some of the most used capabilities of the better graphics manipulation programs. The list is by no means all-inclusive. There are a myriad of choices associated with the application of most of these features.
Selection
One of the prerequisites for many of the applications mentioned below is a method of selecting part(s) of an image, thus applying a change selectively without affecting the entire picture. Most graphics programs have several means of accomplishing this, such as:
- a marquee tool for selecting rectangular or other regular polygon-shaped regions,
- a lasso tool for freehand selection of a region,
- a magic wand tool that selects objects or regions in the image defined by proximity of color or luminance,
- vector-based pen tools,
as well as more advanced facilities such as edge detection, masking, alpha compositing, and color and channel-based extraction. The border of a selected area in an image is often animated with the marching ants effect to help the user to distinguish the selection border from the image background.
Layers


Another feature common to many graphics applications is that of Layers, which are analogous to sheets of transparent acetate (each containing separate elements that make up a combined picture), stacked on top of each other, each capable of being individually positioned, altered, and blended with the layers below, without affecting any of the elements on the other layers. This is a fundamental workflow that has become the norm for the majority of programs on the market today, and enables maximum flexibility for the user while maintaining non-destructive editing principles and ease of use.
Image size alteration
Image editors can resize images in a process often called image scaling, making them larger, or smaller. High image resolution cameras can produce large images, which are often reduced in size for Internet use. Image editor programs use a mathematical process called resampling to calculate new pixel values whose spacing is larger or smaller than the original pixel values. Images for Internet use are kept small, say 640 x 480 pixels, which would equal 0.3 megapixels.
Cropping an image
Digital editors are used to crop images. Cropping creates a new image by selecting a desired rectangular portion from the image being cropped. The unwanted part of the image is discarded. Image cropping does not reduce the resolution of the area cropped. Best results are obtained when the original image has a high resolution. A primary reason for cropping is to improve the image composition in the new image.
 |
 |
Cutting out a part of an image from the background
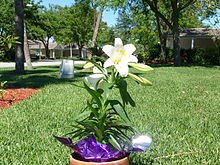
Using a selection tool, the outline of the figure or element in the picture is traced/selected, and then the background is removed. Depending on how intricate the "edge" is this may be more or less difficult to do cleanly. For example, individual hairs can require a lot of work. Hence the use of the "green screen" technique (chroma key) which allows one to easily remove the background.
Histogram
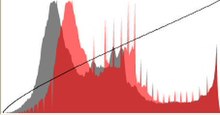
Image editors have provisions to create an image histogram of the image being edited. The histogram plots the number of pixels in the image (vertical axis) with a particular brightness value (horizontal axis). Algorithms in the digital editor allow the user to visually adjust the brightness value of each pixel and to dynamically display the results as adjustments are made. Improvements in picture brightness and contrast can thus be obtained.[6]
 |
 |
Noise reduction
Image editors may feature a number of algorithms which can add or remove noise in an image. Some JPEG artifacts can be removed; dust and scratches can be removed and an image can be de-speckled. Noise reduction merely estimates the state of the scene without the noise and is not a substitute for obtaining a "cleaner" image. Excessive noise reduction leads to a loss of detail, and its application is hence subject to a trade-off between the undesirability of the noise itself and that of the reduction artifacts.
Noise tends to invade images when pictures are taken in low light settings. A new picture can be given an 'antiqued' effect by adding uniform monochrome noise.
Removal of unwanted elements
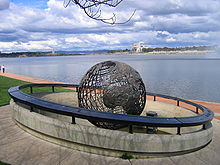
Most image editors can be used to remove unwanted branches, etc., using a "clone" tool. Removing these distracting elements draws focus to the subject, improving overall composition.
 |
 |
Selective color change
Some image editors have color swapping abilities to selectively change the color of specific items in an image, given that the selected items are within a specific color range.

Image orientation
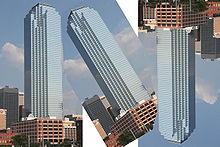
Image editors are capable of altering an image to be rotated in any direction and to any degree. Mirror images can be created and images can be horizontally flipped or vertically flopped. A small rotation of several degrees is often enough to level the horizon, correct verticality (of a building, for example), or both. Rotated images usually require cropping afterwards, in order to remove the resulting gaps at the image edges.
Perspective control and distortion

Some image editors allow the user to distort (or "transform") the shape of an image. While this might also be useful for special effects, it is the preferred method of correcting the typical perspective distortion that results from photographs being taken at an oblique angle to a rectilinear subject. Care is needed while performing this task, as the image is reprocessed using interpolation of adjacent pixels, which may reduce overall image definition. The effect mimics the use of a perspective control lens, which achieves a similar correction in-camera without loss of definition.
Lens correction
Photo manipulation packages have functions to correct images for various lens distortions, including pincushion, fisheye, and barrel distortions. The corrections are in most cases subtle, but can improve the appearance of some photographs.
Enhancing images
In computer graphics, the enhancement of an image is the process of improving the quality of a digitally stored image by manipulating the image with software. It is quite easy, for example, to make an image lighter or darker, or to increase or decrease contrast. Advanced photo enhancement software also supports many filters for altering images in various ways.[7] Programs specialized for image enhancement are sometimes called image editors.
Sharpening and softening images
Graphics programs can be used to both sharpen and blur images in a number of ways, such as unsharp masking or deconvolution.[8] Portraits often appear more pleasing when selectively softened (particularly the skin and the background) to better make the subject stand out. [citation needed] This can be achieved with a camera by using a large aperture, or in the image editor by making a selection and then blurring it. Edge enhancement is an extremely common technique used to make images appear sharper, although purists frown on the result as appearing unnatural.
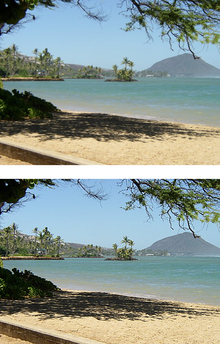
Another form of image sharpening involves a form of contrast. This is done by finding the average color of the pixels around each pixel in a specified radius, and then contrasting that pixel from that average color. This effect makes the image seem clearer, seemingly adding details. An example of this effect can be seen to the right. It is widely used in the printing and photographic industries for increasing the local contrasts and sharpening the images.
Selecting and merging of images

Many graphics applications are capable of merging one or more individual images into a single file. The orientation and placement of each image can be controlled.
When selecting a raster image that is not rectangular, it requires separating the edges from the background, also known as silhouetting. This is the digital-analog of cutting out the image from a physical picture. Clipping paths may be used to add silhouetted images to vector graphics or page layout files that retain vector data. Alpha compositing, allows for soft translucent edges when selecting images. There are a number of ways to silhouette an image with soft edges, including selecting the image or its background by sampling similar colors, selecting the edges by raster tracing, or converting a clipping path to a raster selection. Once the image is selected, it may be copied and pasted into another section of the same file, or into a separate file. The selection may also be saved in what is known as an alpha channel.
A popular way to create a composite image is to use transparent layers. The background image is used as the bottom layer, and the image with parts to be added are placed in a layer above that. Using an image layer mask, all but the parts to be merged is hidden from the layer, giving the impression that these parts have been added to the background layer. Performing a merge in this manner preserves all of the pixel data on both layers to more easily enable future changes in the new merged image.
Slicing of images
A more recent tool in digital image editing software is the image slicer. Parts of images for graphical user interfaces or web pages are easily sliced, labeled and saved separately from whole images so the parts can be handled individually by the display medium. This is useful to allow dynamic swapping via interactivity or animating parts of an image in the final presentation.
Special effects
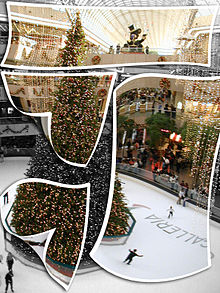
Image editors usually have a list of special effects that can create unusual results. Images may be skewed and distorted in various ways. Scores of special effects can be applied to an image which include various forms of distortion, artistic effects, geometric transforms and texture effects,[9] or combinations thereof.

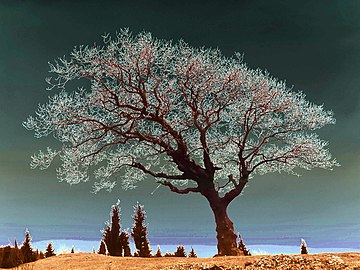
Using custom Curves settings[10] in Image editors such as Photoshop, one can mimic the "pseudo-solarisation" effect, better known in photographic circles as the Sabattier-effect.
Stamp Clone Tool
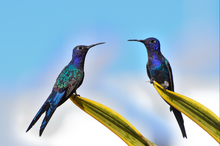
The Clone Stamp tool selects and samples an area of your picture and then uses these pixels to paint over any marks. The Clone Stamp tool acts like a brush so you can change the size, allowing cloning from just one pixel wide to hundreds. You can change the opacity to produce a subtle clone effect. Also, there is a choice between Clone align or Clone non-align the sample area. In Photoshop this tool is called Clone Stamp, but it may also be called a Rubber Stamp tool.
 |
Change color depth
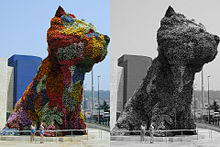
It is possible, using the software, to change the color depth of images. Common color depths are 2, 4, 16, 256, 65,536 and 16.7 million colors. The JPEG and PNG image formats are capable of storing 16.7 million colors (equal to 256 luminance values per color channel). In addition, grayscale images of 8 bits or less can be created, usually via conversion and down-sampling from a full-color image. Grayscale conversion is useful for reducing the file size dramatically when the original photographic print was monochrome, but a color tint has been introduced due to aging effects.
Contrast change and brightening
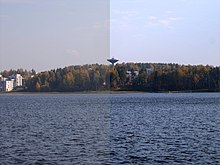
Image editors have provisions to simultaneously change the contrast of images and brighten or darken the image. Underexposed images can often be improved by using this feature. Recent advances have allowed more intelligent exposure correction whereby only pixels below a particular luminosity threshold are brightened, thereby brightening underexposed shadows without affecting the rest of the image.
The exact transformation that is applied to each color channel can vary from editor to editor. GIMP applies the following formula:[11]
if (brightness < 0.0)  value = value * ( 1.0 + brightness);
                  else value = value + ((1 - value) * brightness);
value = (value - 0.5) * (tan ((contrast + 1) * PI/4) ) + 0.5;
where value is the input color value in the 0..1 range and brightness and contrast are in the −1..1 range.
Gamma correction
In addition to the capability of changing the images' brightness and/or contrast in a non-linear fashion, most current image editors provide an opportunity to manipulate the images' gamma value.
Gamma correction is particularly useful for bringing details that would be hard to see on most computer monitors out of shadows. In some image editing software, this is called "curves", usually, a tool found in the color menu, and no reference to "gamma" is used anywhere in the program or the program documentation. Strictly speaking, the curves tool usually does more than simple gamma correction, since one can construct complex curves with multiple inflection points, but when no dedicated gamma correction tool is provided, it can achieve the same effect.
Color adjustments

The color of images can be altered in a variety of ways. Colors can be faded in and out, and tones can be changed using curves or other tools. The color balance can be improved, which is important if the picture was shot indoors with daylight film, or shot on a camera with the white balance incorrectly set. Special effects, like sepia tone and grayscale, can be added to an image. In addition, more complicated procedures, such as the mixing of color channels, are possible using more advanced graphics editors.
The red-eye effect, which occurs when flash photos are taken when the pupil is too widely open (so that light from the flash that passes into the eye through the pupil reflects off the fundus at the back of the eyeball), can also be eliminated at this stage.
Dynamic blending

Advanced Dynamic Blending is a concept introduced by photographer Elia Locardi in his blog Blame The Monkey to describe the photographic process of capturing multiple bracketed exposures of a land or cityscape over a specific span of time in a changing natural or artificial lighting environment. Once captured, the exposure brackets are manually blended together into a single High Dynamic Range image using post-processing software. Dynamic Blending images serve to display a consolidated moment. This means that while the final image may be a blend of a span of time, it visually appears to represent a single instant.[12][13][14]
Printing
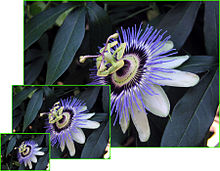
Controlling the print size and quality of digital images requires an understanding of the pixels-per-inch (ppi) variable that is stored in the image file and sometimes used to control the size of the printed image. Within Adobe Photoshop's Image Size dialog, the image editor allows the user to manipulate both pixel dimensions and the size of the image on the printed document. These parameters work together to produce a printed image of the desired size and quality. Pixels per inch of the image, pixel per inch of the computer monitor, and dots per inch on the printed document are related, but in use are very different. The Image Size dialog can be used as an image calculator of sorts. For example, a 1600 × 1200 image with a resolution of 200 ppi will produce a printed image of 8 × 6 inches. The same image with 400 ppi will produce a printed image of 4 × 3 inches. Change the resolution to 800 ppi, and the same image now prints out at 2 × 1.5 inches. All three printed images contain the same data (1600 × 1200 pixels), but the pixels are closer together on the smaller prints, so the smaller images will potentially look sharp when the larger ones do not. The quality of the image will also depend on the capability of the printer.
Warping
This section is empty. You can help by adding to it. (November 2018) |
See also
- Color space
- Comparison of raster graphics editors
- Computer graphics
- Digital darkroom
- Digital image processing
- Digital painting
- Dynamic imaging
- Digital photograph restoration
- Graphic art software
- Graphics file format summary
- Homomorphic filtering
- Image development (visual arts)
- Image distortion
- Image processing
- Image retrieval
- Image warping
- Inpainting
- Photograph manipulation
References
This article includes a list of general references, but it lacks sufficient corresponding inline citations. (March 2011) |
- ^ Johnson, Justin; Alahi, Alexandre; Fei-Fei, Li (2016-03-26). "Perceptual Losses for Real-Time Style Transfer and Super-Resolution". arXiv:1603.08155 [cs.CV].
- ^ Grant-Jacob, James A; Mackay, Benita S; Baker, James A G; Xie, Yunhui; Heath, Daniel J; Loxham, Matthew; Eason, Robert W; Mills, Ben (2019-06-18). "A neural lens for super-resolution biological imaging". Journal of Physics Communications. 3 (6): 065004. Bibcode:2019JPhCo...3f5004G. doi:10.1088/2399-6528/ab267d. ISSN 2399-6528.
- ^ Blau, Yochai; Michaeli, Tomer (2018). The perception-distortion tradeoff. IEEE Conference on Computer Vision and Pattern Recognition. pp. 6228–6237. arXiv:1711.06077. doi:10.1109/CVPR.2018.00652.
- ^ Zeeberg, Amos (2023-08-23). "The AI Tools Making Images Look Better". Quanta Magazine. Retrieved 2023-08-28.
- ^ Cohen, Joseph Paul; Luck, Margaux; Honari, Sina (2018). "Distribution Matching Losses Can Hallucinate Features in Medical Image Translation". In Alejandro F. Frangi; Julia A. Schnabel; Christos Davatzikos; Carlos Alberola-López; Gabor Fichtinger (eds.). Medical Image Computing and Computer Assisted Intervention – MICCAI 2018. 21st International Conference, Granada, Spain, September 16–20, 2018, Proceedings, Part I. Lecture Notes in Computer Science. Vol. 11070. pp. 529–536. arXiv:1805.08841. doi:10.1007/978-3-030-00928-1_60. ISBN 978-3-030-00927-4. S2CID 43919703. Retrieved 1 May 2022.
- ^ Detailed introduction to histograms Archived 2017-03-17 at the Wayback Machine and the levels Archived 2017-03-18 at the Wayback Machine and curves Archived 2017-03-17 at the Wayback Machine functionality available in most image editing software; PhotoshopEssentials.com
- ^ Implementations include Imagic Photo Archived 2013-01-03 at archive.today, Viesus Archived 2022-02-09 at the Wayback Machine, and Topaz Archived 2018-05-13 at the Wayback Machine
- ^ Implementations include FocusMagic Archived 2008-05-09 at the Wayback Machine, and Photoshop Archived 2008-06-03 at the Wayback Machine
- ^ JPFix. "Skin Improvement Technology". Archived from the original on 2016-03-05. Retrieved 2008-08-23.
- ^ Guyer, Jeff (24 September 2013). "The Sabattier Effect". Digital Photography School. Archived from the original on 2019-01-09. Retrieved 2019-01-09.
- ^ GIMP source code for brightness and contrast image filtering.
- ^ Lazzell, Jeff. "A Dynamic Blending and Post Processing Workshop With Travel Photographer Elia Locardi". blog.xritephoto.com. Archived from the original on September 11, 2016. Retrieved Sep 11, 2016.
- ^ Cedric, De Boom. "Blending moments in time". cedricdeboom.github.io. Archived from the original on October 8, 2016. Retrieved Sep 11, 2016.
- ^ "HDR photography with Elia Locardi". www.cnet.com. Archived from the original on September 22, 2016. Retrieved Sep 11, 2016.
- "Fantasy, fairy tale and myth collide in images: By digitally altering photos of landscapes, artist Anthony Goicolea creates an intriguing world", The Vancouver Sun (British Columbia); June 19, 2006.
- "It's hard to tell where pixels end and reality begins", The San Francisco Chronicle; September 26, 2006.
- "Virtual Art: From Illusion to Immersion", MIT Press 2002; Cambridge, Massachusetts
